Customizing Windows in visionOS
Developing for visionOS, it may seem like your app is stuck in a flat pane of glass. But with the right SwiftUI modifiers — and maybe a sneaky call to UIKit — we can achieve some neat effects! Read on to learn few of the windowing tricks I learned making Clocks for Apple Vision Pro.
Make a transparent window
Let’s start with the thing we all want to do at one point or another: remove the glass background from our window. Like many things with SwiftUI, this is quite easy once you find the right modifier: just set .windowStyle(.plain) on your WindowGroup.
@main
struct MyApp: App {
    var body: some Scene {
        WindowGroup {
            ContentView()
        }
        .windowStyle(.plain)
    }
}
And voilà, a transparent window!
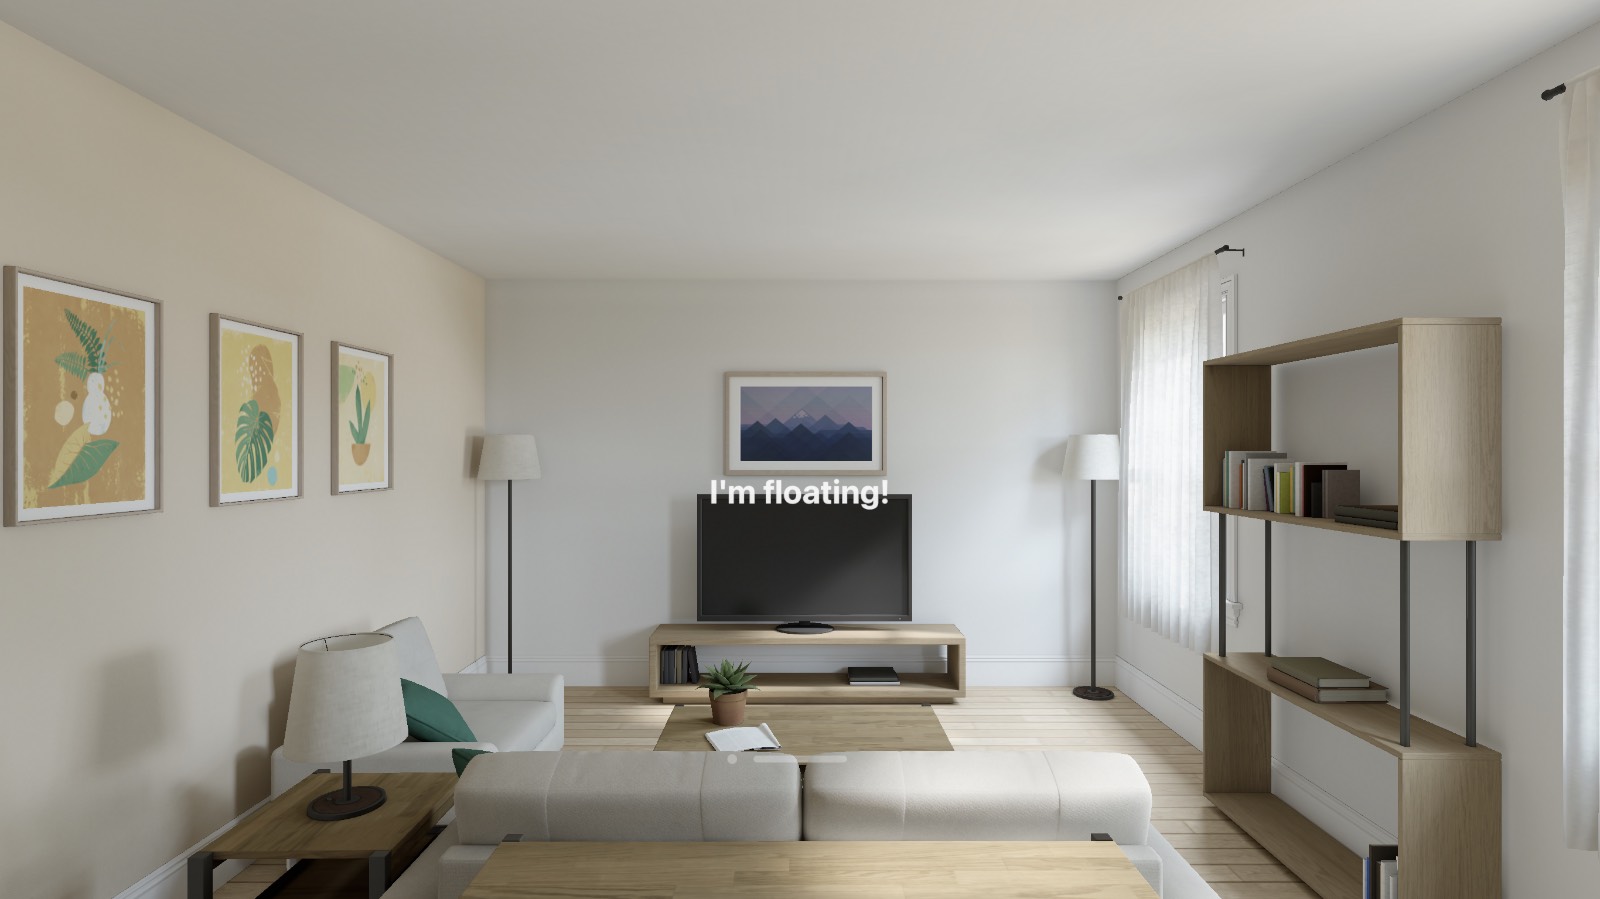
Of course, this window may be quite hard for our users to move or resize (or even see!), so we should also learn how to…
Add glass background to a view
Again, adding a glass background is easy if you know the right incancation: .glassBackgroundEffect(). Those of you familiar with SwiftUI's Material backgrounds might have thought that was the answer, but no, visionOS is much to fancy for that.
Anyway, let's look at this modifier:
func glassBackgroundEffect<S>(
    in shape: S,
    displayMode: GlassBackgroundDisplayMode = .always
) -> some View where S : InsettableShape
It has two options: shape and display mode. Display mode controls the visibility of the glass background and you can pass one of .always, .never, or .implicit.
The shape parameter is more interesting: it appears to accept any InsettableShape, but in practice only a few work: RoundedRectangle, Capsule, and Circle. Any other shape will appear as a simple rectangle and will lack specular highlights around the edges. As the documentation) says:
Prefer a shape for the background that has rounded corners. An unsupported shape style resolves to a rectangle.
Here is some sample code and a screenshot of how the different shapes look:
struct ContentView: View {
    var body: some View {
        VStack {

            Text("Capsule")
                .padding()
                .glassBackgroundEffect(in: .capsule)

            Text("Circle")
                .padding(50)
                .glassBackgroundEffect(in: .circle)

            Text("Round Rect")
                .padding()
                .glassBackgroundEffect(in: .rect(cornerRadius: 11))

            Text("Rectangle")
                .padding()
                .glassBackgroundEffect(in: .rect)
        }
        .font(.extraLargeTitle)
    }
}
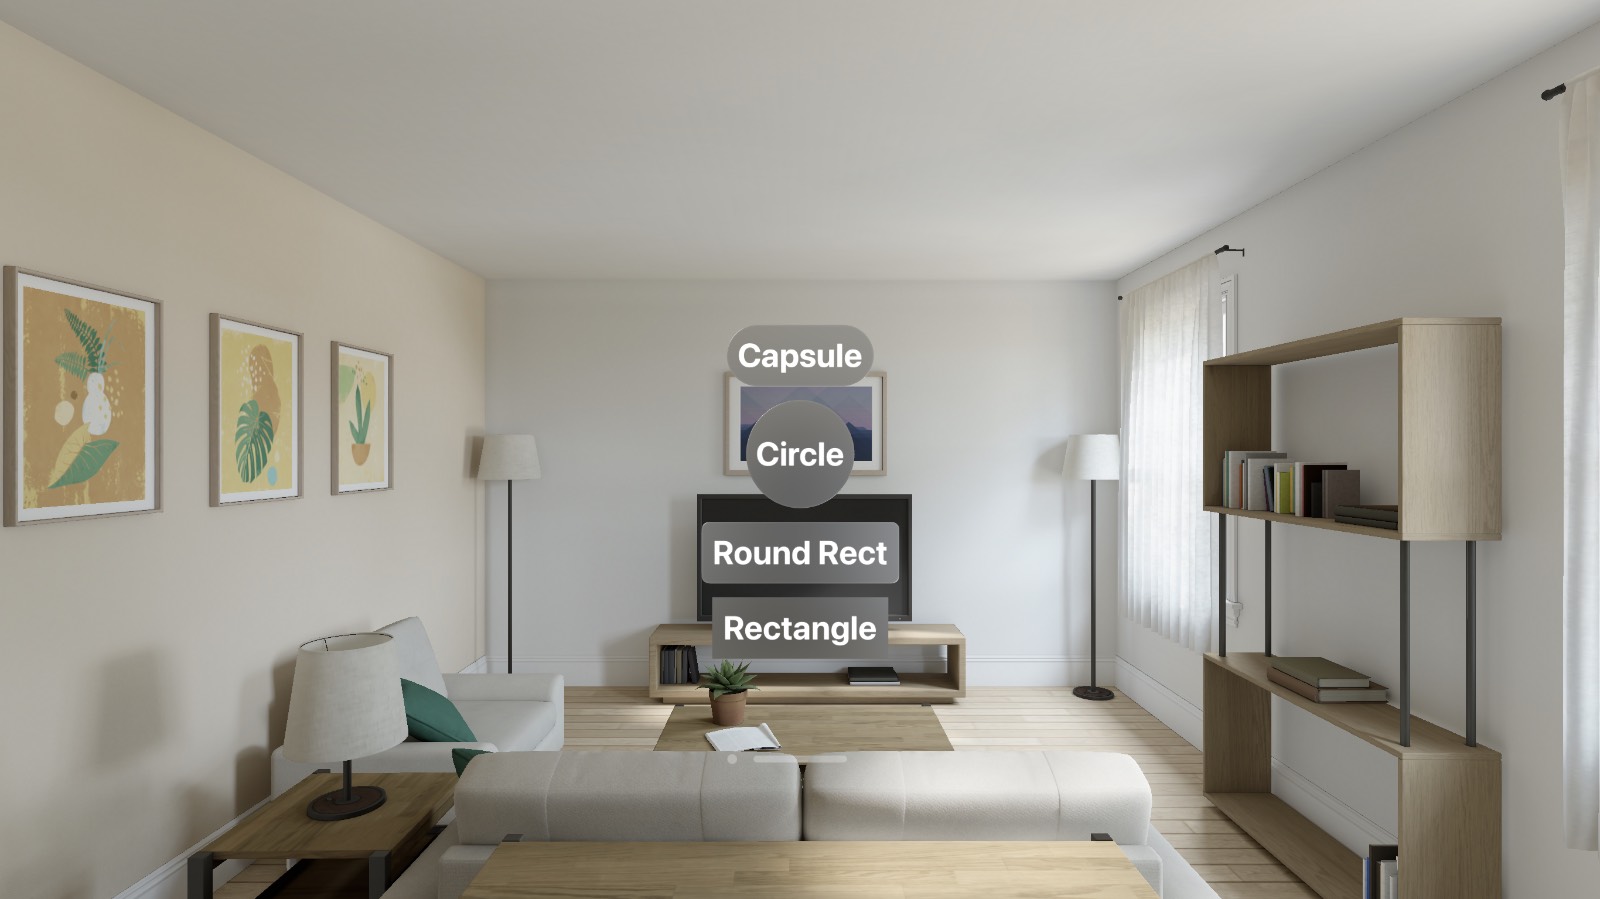
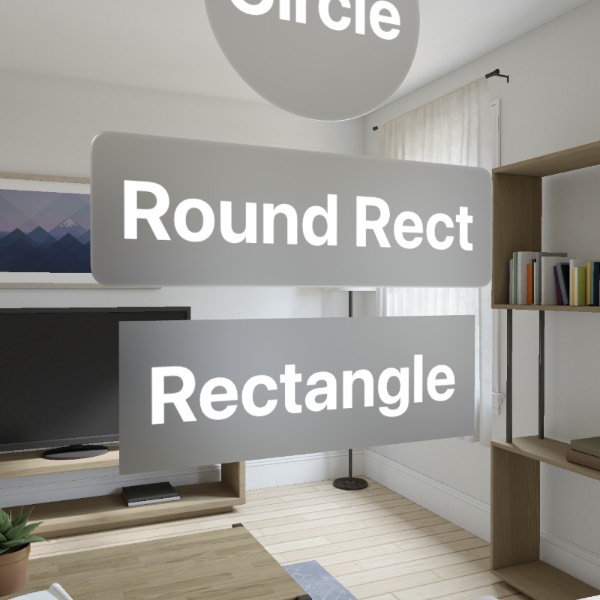
Notice the lack of specular highlights — the light-catching edges of the glass panes — on the sharp-cornered rectangle.
Into the third dimension!
Now that we have a transparent window and know how to create multiple glass-backed views inside of it, we can play around with some fun 3D effects and layouts.
Use .offset(z:) to stack and overlay your views in three dimensions. Or try playing around with .rotation3DEffect(_:axis:anchor:) to tilt and turn your views in 3D.
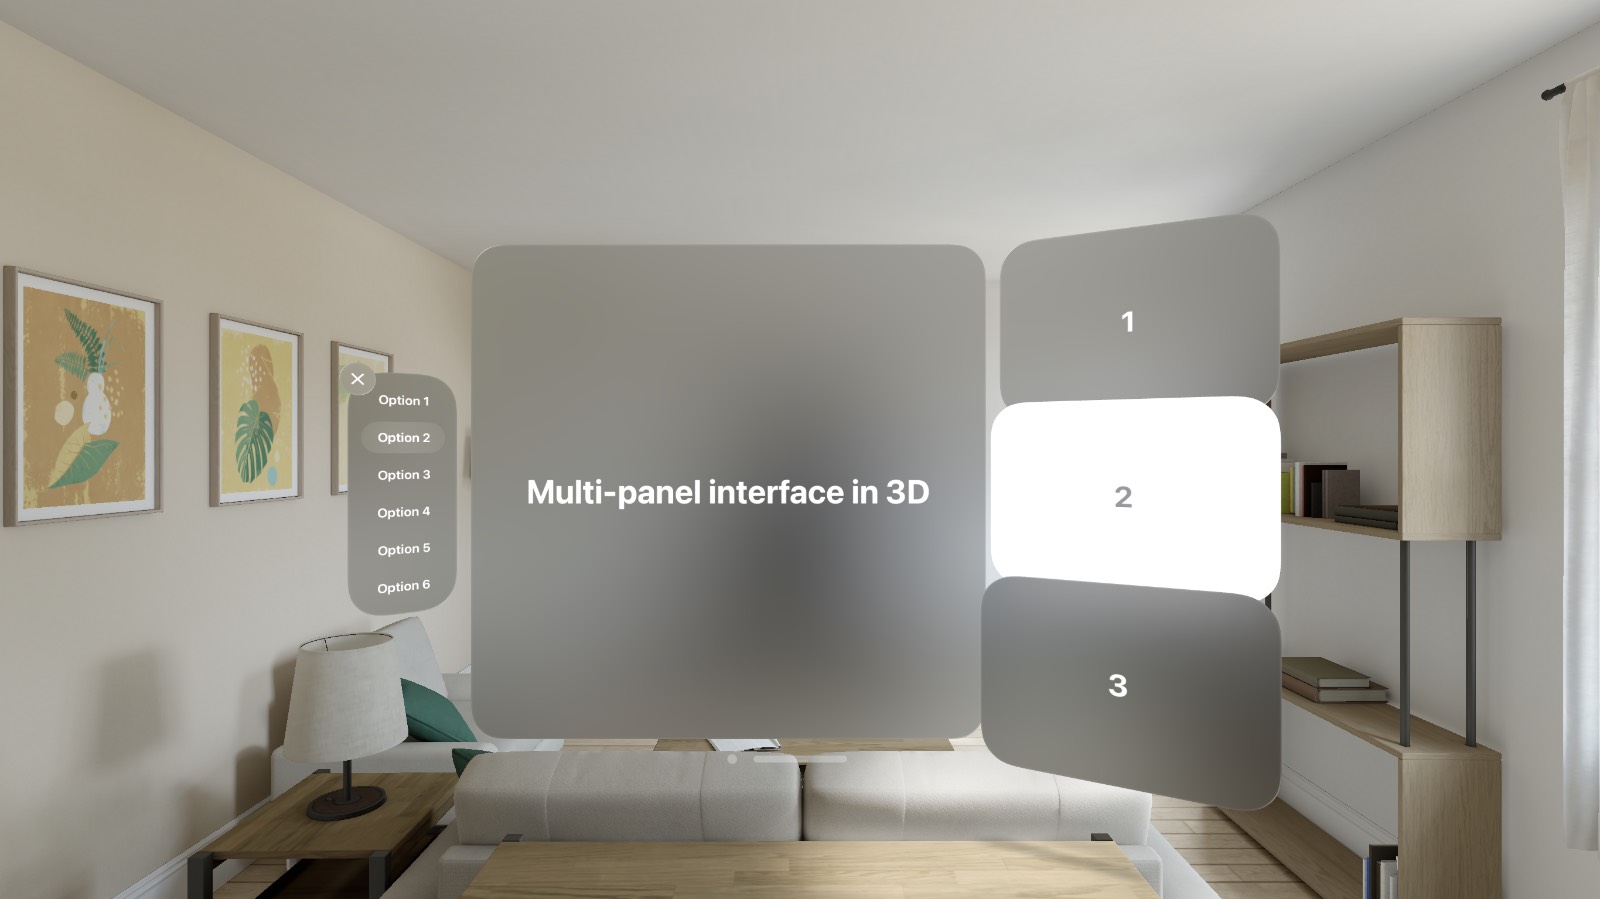
struct PanelView: View {
    var body: some View {
        HStack(spacing: 20) {

            ZStack(alignment: .topLeading) {
                ListView()
                    .glassBackgroundEffect()

                Button("Close", systemImage: "xmark", action: { })
                    .labelStyle(.iconOnly)
                    .glassBackgroundEffect(in: .circle)
                    .offset(x: -20, y: -10)
                    .offset(z: 10)
            }
            .rotation3DEffect(.degrees(40),
                              axis: .y,
                              anchor: .trailing)

            MainView()
                .glassBackgroundEffect()

            VStack(spacing: -20) {
                DetailView()
                    .glassBackgroundEffect()
                DetailView(style: .light)
                    .glassBackgroundEffect()
                    .offset(z: 45)
                DetailView(style: .dark)
                    .glassBackgroundEffect()
                    .offset(z: 90)
            }
            .rotation3DEffect(.degrees(-30),
                              axis: .y,
                              anchor: .leading)
        }
    }
}
If you want to get really fancy, try combining these modifiers with animation and interactivity, like this flippy interaction from my Clocks app:
Set a window’s default and minimum size
Setting a window's minimum size is straightforward: use .frame(minWidth:minHeight:) on your view. This also works for maxWidth and maxHeight if you want to specify a maximum size for a window.
Now you might think .frame(idealWidth:idealHeight:) would set a window's default size, but these parameters don't seem to do anything. Instead, use the new(ish) modifier .defaultSize(width:height:) on your WindowGroup.
If that's a little unclear, here's a full example:
WindowGroup {
    PanelView()
        .frame(minWidth: 540, minHeight: 320)
}
.windowStyle(.plain)
.defaultSize(width: 800, height: 600)
Resize a window
Programmatically resizing a window — at least as-of visionOS 1.1 — can only be done with UIKit. Specifically, you need to have your window's UIWindowScene so you can call requestGeometryUpdate with a new size like so:
let size = CGSize(width: 1440, height: 900)
windowScene.requestGeometryUpdate(.Vision(size: size))
There are a few ways to get the current UIWindowScene in SwiftUI, but the most common — looping through UIApplication.shared.connectedScenes to find the key window — is risky on visionOS because window foregrounding and focus don't work like they do on other platforms.
Instead of doing that, I'll link to two better solutions:
- Create
AppDelegateandSceneDelegateclasses and use them to capture a reference to yourUIWindow, as explained in this excellent Stack Overflow answer by Asperi. - Create a
UIViewRepresentablethat captures its parentUIWindowand passes it up the view hierarchy using aPreferenceKey. I'm using the WindowSceneReader library by David Walter, which elegantly handles all this messiness for me.
Hide the standard window controls
Add .persistentSystemOverlays(.hidden) to a view to hide the standard window controls, i.e., the close button and drag bar. They'll appear briefly when the window opens before disappearing; the controls reappear if the user “taps” on the window, or you can control this programatically with a ternary operator, e.g.:
struct ControlHidingView<Content: View>: View {
    @ViewBuilder var content: ()->Content
    @State var hideControls = true

    var body: some View {
        content()
            .onTapGesture {
                hideControls.toggle()
            }
            .persistentSystemOverlays(hideControls ? .hidden : .visible)
    }
}
This modifier also works for hiding the Home indicator on iOS.
--
That's it for now! If you have any questions/comments/corrections, feel free to reach out to @adam@iosdev.space on Mastodon or @aoverholtzer on Twitter. And if this article has been helpful, please check out my apps. Thanks for reading!
Posted by Adam Overholtzer on February 29, 2024